Friday, 22 February 2013

Common Photography Faults

Setting up your camera for beginners....


Ah! those tiresome old jokes about not forgetting to take the lens cap off! Here are few newer ways for improving things before you start work:-

1.CHARGE YOUR BATTERIES
Always recharge your batteries if you are taking your camera with you for a day out. There are few things more irritating than to have to stop work because the battery is flat. Extreme cold is bad for batteries. Keep your charged batteries warm in your coat pocket.

2.INSTALL CARDS
 Check that you have a card in the camera and some spare cards as well. Cards have got bigger and bigger over the years and the price has fallen considerably.You could be tempted to buy one very big card. Years ago, I worked for Kodak as a wedding photographer just as they were changing over to digital imaging. The standard advice was to shoot each wedding on about 4 different cards. Then if one was corrupted you still had three cards left of a unique event. The same is still true: I would never do a whole holiday on just one card especially if it would be difficult to repeat it.

3.SELECT A COLOUR TEMPERATURE
Try to set the correct colour balance for your camera. The colour of the light changes according to the light source and any filtration. If you start photographing a landscape in the morning the light is very blue. Later it might become cloudy. This will filter the sunlight behind the clouds making it slightly cold. In the evening the the light will turn orange as the sun sets. Indoors a room could be lit by a candle, tungsten bulb, or fluorescent light. Each is a different colour. Often a range of colours can be mixed together as with sunlight filtering into a room mixing with colours from television and a reading lamp. Dealing with this jumble of different types and colours of light  can be difficult for cameras. So its best to start off with the colour of light you believe to be nearest to correct. In the pictures below you can see the dramatic effects of natural lighting and red spotlights. Both pictures are truthful but in very different ways.


To adjust the light do the following.
Find the symbols that appear on the colour control panel on your camera.Select the most suitable symbol for the type of light that occurs. If everything is mixed light use the automatic light adjustment. More sophisticated cameras allow a custom light balance to get the setting right. Colour can be usually further refined by adjusting it in a photo editing programme.

5. SELECT A FILE TYPE
Modern cameras often allow a range of picture (file) sizes to be chosen. The size you choose heavily influences what you can easily use the pictures for after the event. If you choose small jpeg files you will get a lot of pictures on a card but they will only be suitable for email and phone pictures. If you want to make photographic prints from the pictures you need to make large files. The best quality files are Raw files usually available on better cameras. You would have to acquire some knowledge of photography to process these.

6. CHOOSE AN ISO NUMBER
ISO is an index of the speed that the chip in your camera responds to light. A high ISO number gives a fast response at the expense of some degradation in the quality of the images. In strong daylight you would use about 400 ISO. For the smoothest images always set your camera as low as you can, usually 100 ISO. Outside, on a changeable day, I would use 400 ISO, or 100 IS0 in strong sunshine. I would probably use this setting for indoor pictures supported by a flash gun.
For pictures taken at night use a very high ISO index number(6400 ISO)because the level of light is very low. At this ISO level the quality of the image begins to degrade. Noise (random wrongly coloured pixels) can be seen in big enlargements. This can be minimised in image processing programs.
  • 100 ISO Normal setting. Sunny day outside.
  • 400 ISO  Overcast days outside. Well lit interiors
  • 1000 ISO Very dull day, Under trees in deep shade.
  • 6400 ISO  Twilight. Well lit streets at night. You might need a tripod for some subjects.

7. BATTERY CONSERVATION
Switching your camera off and on continually depletes the battery quite quickly. If better to leave it switched on and let the battery conservation system temporarily switch off.

8. PROTECT YOUR CAMERA.
Keep your camera in a decent bag that will protect it if it is dropped. Lots of photographers protect the lens by fitting a screw in UV filter. This makes very little difference to the to the images visually and can be cheaply replaced if scratched.
Do not leave it in the sun for a long period of time.

Make all of the above checks before you start each shooting session. Although photos can now be modified considerably after they are taken it can be complex and skilled work to do well. Get it right in the camera!
I've forgotten to do most of the above at sometime or other. Try to find a quiet space to check your camera over before a shoot.

Monday, 11 February 2013

Photographing white paper.


Photographing white paper.

I get a number of interesting requests for help with photo projects that grow out of the one day short courses that I run in my studio.(www.david-turner-photography.co.uk ) Many of my customers run small Internet businesses of one form or another. This problem came from a man who was well informed about the technical aspects of photography and had set up a website to sell high quality sheets of paper suitable for use by artists, craft workers and designers. I think he must have been using some form of template website that allowed only small samples to be shown in his website shop.
The problem was that a sheet of white paper, irrespective of its high quality and hand made attributes, doesn't look very exciting as a small square on a website. Grey paper, looks even worse.
Like most of my customers he had a selection of bits of lighting equipment acquired over the years that he was trying to use. Some of the equipment he had been sold wasn't very suitable for the job it had to do.They were fluorescent light bulbs of the coiled type.These can be successfully used on static subject matter where a very soft light is needed.
The problem was that a hard light was needed to bring out the texture on the art paper surface.Usually people have problems creating soft lighting. This one was the other way round. If there is a moral to this storey it should be that good information is best obtained before you buy equipment. It is equally true to say that situations change over time and one bit of gear cannot solve all of your problems.

Monday, 14 February 2011

Planning studio lighting effects. Hat shoot

 You might think that photographing a few hats was a simple problem. To get the results shown here two very separate lighting systems were involved. The studio was divided  into background light and lighting to show the qualities of the hats.
Lighting kits for studio work usually come with a few different ways of controlling the spread of the light umbrellas, soft boxes, snoots etc. To get the best out of each subject its important the the light shading is carefully matched to the qualities of the objects being photographed. In this particular case all of the hats had a wide range of surface textures plus  the model's hair and complexion. Rather than opting for large umbrellas or solftboxes that render a smoothing effect on the lighted subject I chose to use a range of honeycomb filters fitted over the lights on the model.
 A honeycomb grid looks exactly like it sounds: is a filter made with hexagonal tubes placed over the flash unit. The tubes or cells are available in a number of different sizes that control the spread of the light. Honeycombs were originally marketed as an economical substitute for a focusing spot light. They have one quality that makes them useful for this type of work. The edge line with a spot is always focused and hard whereas the edge rendered by a honeycomb tends to be soft.  The size of the light patch is also fairly easy to control. The slightly harsher light brings out the texture in the hat surfaces. In all of the pictures shown three honeycomb grids were used. The first was a large size grid over the front of a small soft box casting an overall soft light on the model. This was placed at about 45 degrees above the model and established the overall lighting of the picture. To this I added another two flash units both fitted with honeycombs to highlight certain aspects of each hat. Below I've shown a closeup to give a better indication of of what the prints really look like. The real beauty of the textiles used can be appreciated from the A4 prints made from file.
Thanks to Felicity Hat Hire of Beaconsfield and (www.felicity.co.uk) for supplying the hats and to Paris De Reuck for modeling them.

Friday, 17 December 2010

Portrait shoots


Portrait shoots

    * Spacious well equipped studio

    * Latest digital equipment. See your pictures appear as they are shot!

    * Unique background colour system

    * No queueing!

    * Digital upload of your photos included free.

    * Fully retouched print included in the shoot price worth £25

    * Lifestyle shoots

    * Each shoot lasts up to three hours.

    * All types of shoot catered for.

A huge range of people come to our Stokenchurch Studio for portrait sessions . Here is a list of recent activities: Birthdays,18+ parties, mother and babies, children, college alumni, friends, pictures for websites, work portraits, musicians, dancers, actors, people with their pets, family groups, partnerships, couples, model portfolios, lifestyle shoots, workshops, industrial clothing, dance groups etc.

Common to all is the need to get a powerful image of themselves. Studio photography can be  a new experience for some of my clients. The key thing is to get organized in advance. Please phone me well before the shoot to discuss what you want to do in your shoot, what the images are going to be used for, and what kind of props you might need. You might want to tear a collection of pictures from magazines to bring with you as rough examples of the sort of thing you want to do. There is plenty of space to store clothes for your shoot. You cannot bring too much with you for the shoot. You will be the a star for the day. All of the pictures are from one shoot with a  model new to studio work.

Make up and props may be important for your image. Clients have come with Harley-Davidson motorbikes, guitars, saxophones, their much loved dog, snakes, bunches of flowers, dreary clothes worn by actors for a part in a play, little black dresses, ball and party wear etc. Other clients have wanted much more formal clothes as their picture was destined to go an an office wall or website imparting a lot of information. What you need to bring depends on what sort of image you need us to create.

A portrait shoot is a real red letter day that you will not forget in a hurry. This is why many of the Studio Portrait Shoots are bought a gifts using our gift voucher system. The giver pays for the shoot and the free print. If the recipient wants additional pictures they pay for the extra prints. (see Gift Vouchers on my website www.david-turner-photography.co.uk)


Thursday, 9 December 2010

Using studio flash. 1

Studio Flash Lighting 1.
General Information.

Over the last few years many amateur photographers have been tempted to buy studio lighting kits to use for mainly indoor work. A large number of brands have appeared from the far east to compete with the more established English, American, and Swiss brands. Anyone looking for a dealer could consult my friend Graham at his website www.gwdigitalandphoto.com for sales advice on what is needed. For beginners its often advantageous to buy a kit that includes some of the very necessary accessories like stands and reflectors etc. You will also need a flash meter.

 Lets assume that  you have acquired a set of studio lights. Most of the products on the market  have the following features:-

1   A modeling light that works in tandem with the flash tube. These can be adjusted from zero up to about 5 stops of light (depending on the particular unit)  The function of the modeling bulb is to mimic the effect of the flash when it occurs. Effectively, all of the light aiming is done with the modeling light and the exposure with the flash tube, so an important criteria in designing the unit is to make the spread and distribution of the two types of light as similar as possible. Cheap brands might not be very good in this respect.

2   There is the odd occasion when it would be desirable to shoot with flash and not have the modeling light switched on, so a switch is usually built in to facilitate this.

3  The strength or power of the flash is adjustable. This is indicated digitally on most modern lights. They are easier to see in a dim studio but no more efficient than the dial type adjusters they have superseded.
.
4  When looking through a camera lens it is difficult to see if all of the flash units have worked so most have either an audible or visual signal, or both, to indicate that each particular unit has fired. On some units the modeling bulb dims after the flash has fired. I prefer the audible signals peeping around the studio in complex shots though it is largely a matter of what you are used to.

5  All of the lights have to be synchronized with the shutter to work at exactly the same moment to give correct exposure. This is achieved by one flash unit being in sync with the camera hot shoe or sync plug. Slave receptors built into the other units then cause them to fire as the camera shutter is opened. They work by UV light. There is also usually a jack plug socket for additional slaves to be used if necessary. Wireless connections are more reliable as the signal is less directional  than UV light. It is also possible to link units together with a wire. An old fashioned method that wasn't very reliable.

6.  Flash units are attached to lighting stands with a standard spigot usually supplied with the stand rather than the light unit.

7.  If they are to be transported in a car a substantial case is needed.

8.  Flash units are powered by capacitors that are quite powerful enough to give you a fatal electric shock. There should be a dump button to allow you to discharge the flash power down the earth cable.

9.   The cost of the flash tube is about half of the complete unit and it is very fragile. Retain the plastic or metal caps used in transit to protect your flash unit
.
10.  Lights on tall stands are very unstable things. Toddlers,cats, and adults have all managed to knock mine over so I weight the base with gravel filled canvas bags. These are homemade.

In order to measure the light you will also need a special form of light meter called a flash meter.  Flash meters are able to measure sudden pulses of light and to trigger the flash units to enable the light emitted by sepate units at different strengths to be measured collectively. (See my other blog on Lighting Ratios.)


Soft box over object.
Lets start off with simple lighting of a small stationary object. Just use one light and some basic equipment such as a small soft box. As you can see from the photograph the light is suspended over a table nearly horizontally . ( It is tilted down at the front a little to cast light on the front elevation of the object.) A sheet of black card is attached to the back of the soft box. This has the effect of shading the light from the background. Depending on how deep the card is alters the amount of cast light bouncing off the background surface. The illustrations below show the card at is maximum size, then folded in half and then removed altogether.


In this picture the contrast is at its maximum rendering the background black at the top and then becoming white at the front.


Now the sheet hanging down from the soft box has been folded in half along its length allowing more light to spill on to the background sheet, reducing the contrast to mid gray.


The sheet has now been removed completely .

A simple sheet of paper can make a lot of difference in the lighting effect.
The big problem for most beginners with limited space and equipment is to support the soft box over the light table. This was done with a boom arm fixed to a substantial lighting stand. The stand was weighted at the base with gravel filled bags. A light weight stand might have tipped over if it was cantilevered too far.

Flash meters.
In order to measure the strength of the light its necessary to have a special type of light meter called a flash meter. Almost all of the flash meters on the market are also conventional light meters very similar to the ones built into most cameras. Built in camera light meters are unsuitable for measuring very short intense bursts of light emitted by the flash units. When used as a separate piece of equipment the flash meter can be pointed at the light source from position of the object or person being photographed.  It measures the light falling on the object or person.This is called incident rather than reflected light metering as the meter measures the light from the subject position.

Where a number of lights are being used a flash meter can be pointed at each light  in turn to evaluate its power in relation to the other flash units. In this particular case things are very simple as there is only one light.  The meter is placed close to the subject (the paper dog) and aimed at the camera lens. The invercone is extended to add light bouncing around the subject and a measurement made of the flash. The camera is set to this amount of exposure.
Flash meters vary a lot in their sophistication. I prefer one that is also a conventional light meter as well as this can be used in other types of photography to check camera light readings. Cameras tend to come and go but many professional photographers stay loyal to their trusted meter as it is an independent measure of exposure.

Wednesday, 20 October 2010

Lighting Ratios And Controlling Contrast In Flash Photography

Studio lighting using flash mono blocs requires that the photographer masters the use of a flash meter. While it might be possible to guess the strength of flash light and then check the results on your camera's LCD, even a simple flash meter will help reduce the amount of time you spend in working out the individual settings for, and exposures  from, each of your flash units, the ratio between their brightnesses, and the final camera settings that you use to make your picture.

The situation is made more complicated by the fact that all photographic prints and drawings have a tonal range that sets the limits to what can be done. You cannot make any part of a picture lighter than the bare white surface of the paper. Similarly it cannot get any darker than the deepest blacks that can be printed. Somehow you have to measure the light emitted by the flash units, add in any daylight or other ambient light, and work out settings that control the contrast of your picture, so that it doesn't exceed the tonal range possible in your print. Only a flashmeter can do this quickly and accurately.

The contrast of a photograph can be expressed as a lighting ratio, which is the difference between the amount of light falling on the the brightest parts of the subject compared to the amount of light in the darkest shadows.

Many flash meters come with a flat light measuring disk designed specifically for working out the lighting ratio, or, like the Sekonic L-358 flash meter I use in the studio, have a retractable dome, sometimes referred to as an invercone, which can be used to measure both the lighting ratio (while retracted) and the overall exposure (while extended). Other models may have a clip-on dome or disk, or even a sliding dome.

The way I set up lighting is to point the flat disk (or the retracted dome) towards the main light and measure the strength of that flash, then point the disk towards the secondary or fill-in lights one by one. Working round the lights one by one, I adjust each to the desired strength. When all of the lights are balanced, the invercone (extended dome ) is pointed at the camera from the subject's position and the cumulative exposure given by all of the flashes measured: the camera is then set to this reading.

Let's look at some examples of different lighting ratios, starting with very flat lighting. 

This is good for showing detail, texture and subtle colour effects. A good example would be the type of picture used by high street fashion stores to show examples of their clothing. The contrast ratio would be 1:2 or one stop difference between the brightness of the main flash light and the fill-in light or reflector. If you look at the shows cast by the figure on the floor you can clearly see that they have very little density. This type of lighting reveals all the surfaces darkened by subtle shading.

 Now lets increase the contrast to 1:3 ratio (1.5 stop difference between the main light and the fill-ins). This gives the subject a little more presence. It would be achieved by lowering the the power of the fill in lights or reflectors. Either turn the fill-ins down or move them slightly further away from the model.  The effect is to reduce their strength thus making the shadows a little darker. The whole picture becomes a little more dramatic and the figure/object appears to have more substance.

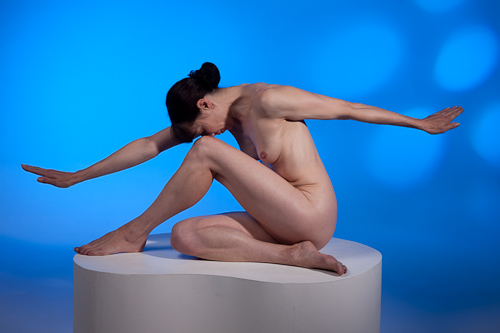
As the contrast gets greater the image grows in strength and the shadows change from being transparent to being superficially solid. The shadows start to play an important role in the picture itself. When you look at the original, rather than the small sized jpeg shown here, it's still possible to see detail in the dark shaded areas of the photo even with a contrast ratio of one to four (two stops) The nude life model is powerfully drawn with light and shade.


Now, let's look at 1:8 contrast ratio (3 stops difference between the main light and the fill-ins) which is about as far as you can go without rendering all of the shaded areas as solid black without any surface texture. Overdone, black areas can look very two dimensional.

Contrast ratios are closely connected with controlling light bouncing around the studio. This last picture was done on the same white background as all of the previous photos. There is just more control over where the light is allowed to fall. In this picture, no light gets on to the background at all, rendering the white surface as a near black.

I believe lighting is best learned by starting very simply with one light and a reflector, and then adding extra lights until the desired effect is achieved. Understanding flash measurement enables the photographer to achieve the desired amount of contrast to construct the  picture. This forms the basis of my teaching on the one day lighting courses I run.

(The model in these pictures is Rosemarie Orwin, art nude and photographic model, who I found to be a pleasure to work with. Highly recommended.)

Monday, 30 August 2010

Simple product or still-life groups.

Chardin and Dutch sixteenth and seventeenth century artists did much to create the still life genre. It lives on today in product  photography and, to a lesser extent, in modern painting. Still-life and product photography aren't always so very far apart since both rely on artistry to elevate the commonplace. A jar of jam, my first light meter, or Grandma's vase, are all lifted from the mundane world and have our attention focused on them simple by isolation from their normal background.

The photos in this blog were done with the simplest of means on the kitchen table. Find a clean flexible sheet of any material.This can be any sympathetic colour, or texture, or surface, as long as its crease free. I used a sheet of cartridge drawing paper to create an infinity curve against the kitchen wall. The table is pushed against a wall with about half of the sheet of paper on the table top and the rest curved gently against the wall. Blue tack was used to fasten the paper in place. From the side it looks like a letter 'L' lying on its back.

To the left of the picture another sheet of white paper or card was used as a reflector....you could use a Lastolite or the dull side of kitchen foil stuck to cardboard with double sided sellotape. Foil would give a slightly harder light.

Lighting was as simple as it gets: window light coming through the kitchen door on the right hand side of the picture. Most of the kitchen is painted white so its filled with a soft light everywhere. Its important that you don't have shafts of strong sunlight coming into your picture area. A tripod was used and the mirror locked up in my camera to make sure that there was absolutely no camera shake. Many cameras do not have this facility. If yours doesn't just try not to jolt the camera when pressing the shutter. Thus the lighting was soft but the exposure very sharp.

If a tripod isn't available then increase the ISO number to about 400 or even higher and you should have just enough light to do a hand held shot. Do not let the speed fall below a sixtieth of a second. Remember that a photo that appears sharp when reviewed on the back of your camera will often be out of focus when enlarged to print size.

Almost anything can be used as subject matter, flowers, old tools, car parts, cakes, works of art, old toys, fishing tackle, medals, jewelery, collections of cups and saucers, babies shoes etc. This very simple background and lighting system is excellent for the type of small item sold on eBay that benefits from better presentation for online retailing.